


Quiz(Confirm Attendance・Test・Questionnaire, etc.)
Quiz Creation
-
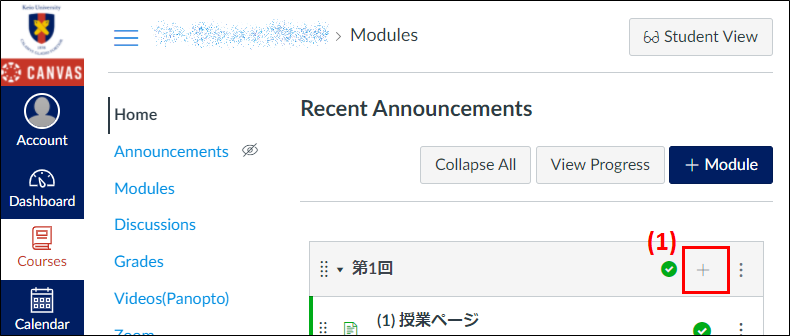
Click the Add Module button (1) [+].
-
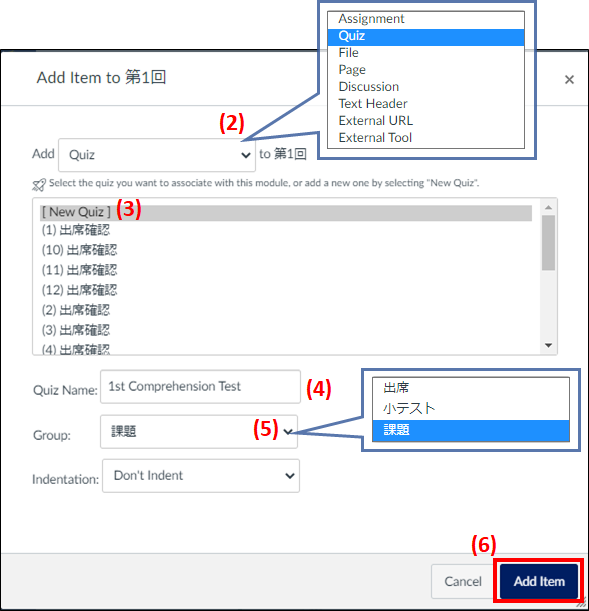
Select [Quiz] with (2), and after selecting [New Quiz] with (3), entering the title with (4) and selecting either [課題/Topic] or [小テスト/Mini Test] with (5), click on (6) [Add Item].
-
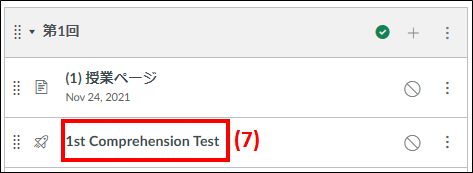
The mini test module will be created on the course, so click on (7) [Title].
-
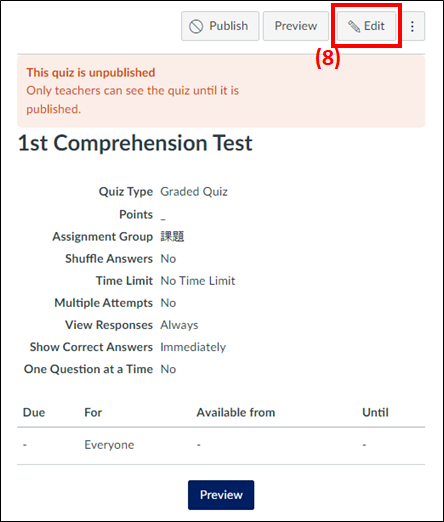
Click on (8) [Edit] at the top right-hand side of the screen.
Edit Quiz: Advanced Tab
The [Advanced] tab will be displayed when [Edit] is clicked.
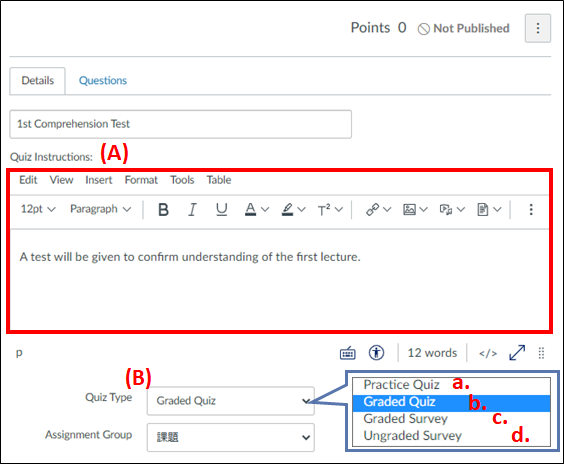
(A) Enter a description of the quiz (topic test). It is possible to insert images, links and equations, etc., to create the quiz in the same way as pages.
(B) Select the quiz type.
- a. Practice Quiz
- Marks will be displayed as the quiz results, but they will not be reflected back on the grades. These will not be displayed in either the syllabus nor the grade reports.
- b. Graded Quiz
- This is the most commonly-used type of quiz. A new column will be added to the grade reports when [Marked Quiz] is selected. Marks will be awarded automatically when attending students answer the quiz questions. (Marks may need to be added manually depending on the question format)
- c.Graded Survey
- A type of quiz that can be used as a questionnaire. Attending students who answer all of the quiz questions will be awarded predetermined marks. They will not be awarded marks for correct/false answers. Respondents may remain anonymous.
- d.Ungraded Survey
- A type of quiz that enables the opinions and other information pertaining to attending students to be collected. Attending students will not be awarded marks for answering the questions. Respondents may remain anonymous in the same way as with c. Mark-Based Surveys. These will not be displayed in either the syllabus nor the grade reports.
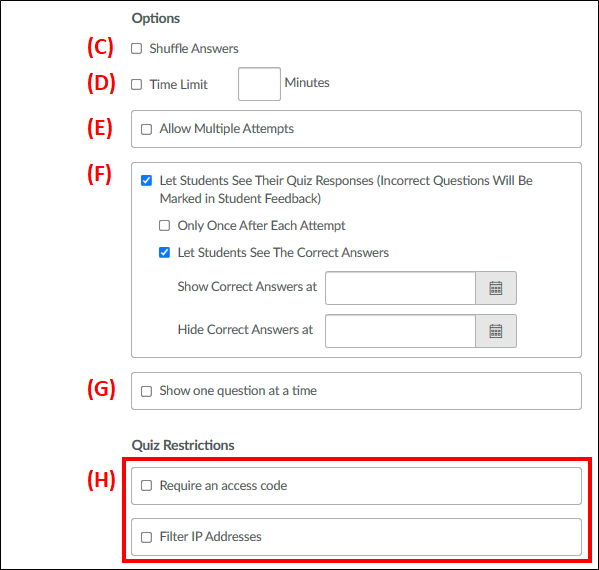
Option
- (C)Shuffle Answers
- The selective options for multiple-choice questions can be shuffled before being set.
- (D)Time Limit
- Specifies the time limit. If no tick is added to this, the attending students will be able to answer the questions with no time restrictions.
- (E)Allow Multiple Attempts
- This enables attending students to answer the questions multiple times. If no tick is added to this, students will only get one attempt. If a tick is added to this, the number of attempts for answering and the scores saved (best score, previous score, average score) can be set.
- (F)Results Displayed for Attending Students After Answering
- This displays the results to attending students after they have answered (listing which questions were answered correctly and incorrectly). If no tick is added to this, only the marks will be displayed for attending students. If a tick is added to [Display Correct Answers to Attending Students], the correct answers to incorrectly answered questions will be displayed, and it is also possible to set the dates and times of display/hide.
- (G)Show one question at a Time
- The questions will be displayed one-by-one for the students to answer.
- (H)Quiz Restrictions
- Attending students will be prompted to enter an access code when answering questions. It is also possible to restrict the place of answering questions by specifying the IP address.
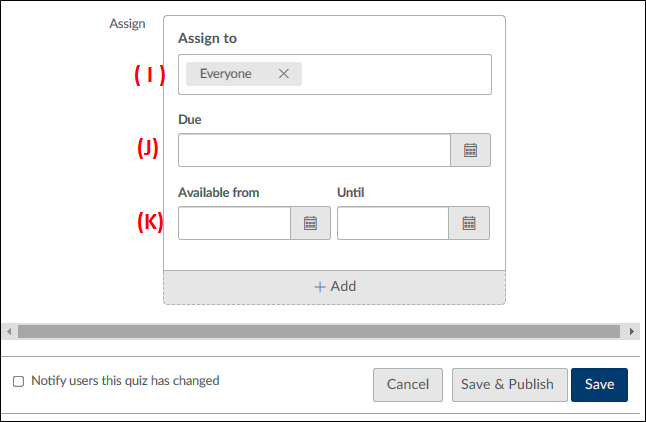
Assignment
- (I)Assign to
- Specifies the people eligible to take the quiz. The default setting assigns eligibility to everyone in the course. It is also possible to assign eligibility to individual students and course sections.
- (J)Due
- Sets the deadline for answering quiz questions.
- (K)Valid Period for Answering
- Sets the valid period for answering quiz questions. The [Take the Quiz] button will not be displayed for attending students outside of the period specified.
Edit Quiz: Question Tab
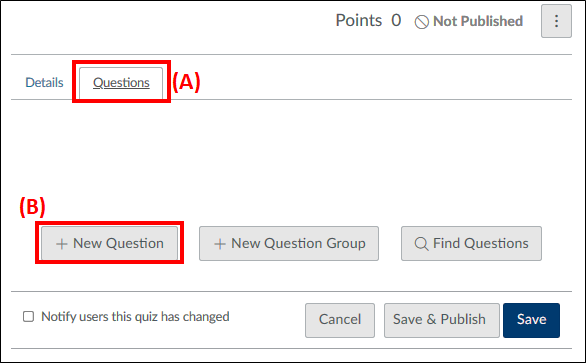
(A) Click on the [Question] tab to display the screen on which it is possible to create the quiz questions.
(B) Click on [+ New Question] to begin creating the question.
If names are to be attached to quiz questions, they may be entered in column (C). Attaching names to questions is useful in that it enables the questions to be easily identified during searches.
The question names will not be revealed to attending students, and the questions will instead be displayed in numerical order (question 1, question 2, etc.).
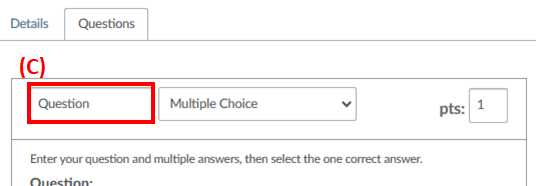
Question types shown below can be selected and created from the drop-down menu in column (D).
Multiple Choice|True / False|Fill-in-the Blank|Fill in Multiple Blanks|Multiple Answers|Multiple DropDowns
Matching|Numerical Answer|Formula Questions|Essay Question
File Upload Question|Text (no question)

The points to be awarded for each question are set in column (E).

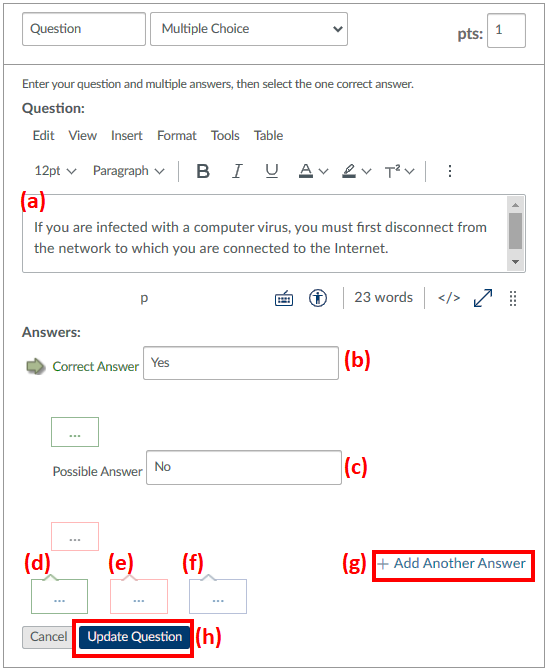
Multiple Choice
Questions for which respondents are prompted to select one correct answer.
(a) Enter the question here, and enter the [Correct Answer] in (b) and the [Incorrect Answers] in (c). Click on (d) to enter a comment pertaining to the correct answer. Enter comments pertaining to incorrect answers in (e), and general comments pertaining to the answer in (f). If an additional field is to be created for the incorrect answer, click on (g) to add one. And finally, click on (h) [Update Questions] to complete the procedure.
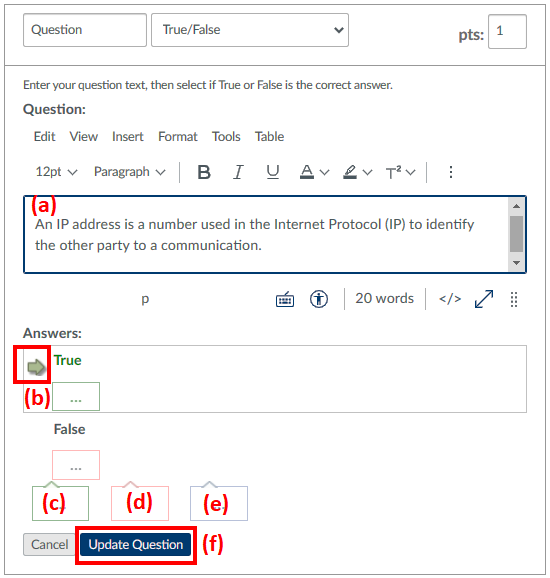
True / False
Questions prompting respondents to answer whether a statement is true or false. Enter the question text, and then select whether the correct answer for the question statement is true or false.
(a) Enter the question here, and then click on the arrow (b) beside the correct answer to set the selection for that answer as [Correct] . Click on (c) to enter a comment pertaining to the correct answer. Enter comments pertaining to incorrect answers in (d), and general comments pertaining to the answer in (e). And finally, click on (f) [Update Questions] to complete the procedure.
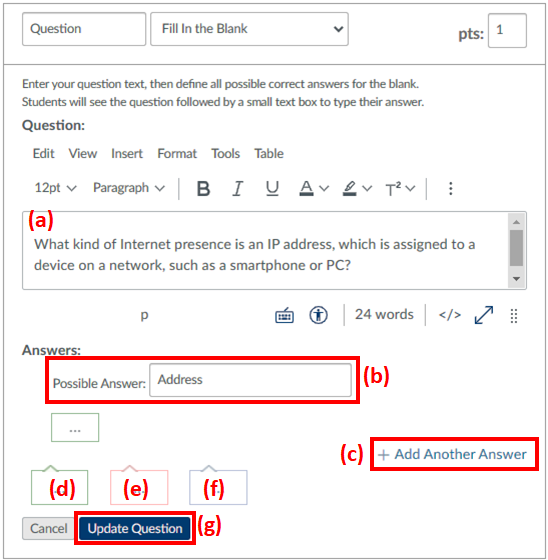
Fill-in-the Blank
The fill-in-the-blank area represents a single question. Enter the question text, and then define the blank area with the answers that are conceivably correct. The attending students will be required to enter their answer to the question in the small text box displayed at the end of the question.
(a) Enter the question here, and enter the [Correct Answer] in (b). If there are multiple correct answer patterns, click on (c) [+ Add Additional Answer] to add those answers. Click on (d) to enter a comment pertaining to the correct answer. Enter comments pertaining to incorrect answers in (e), and general comments pertaining to the answer in (f). And finally, click on (g) [Update Questions] to complete the procedure.
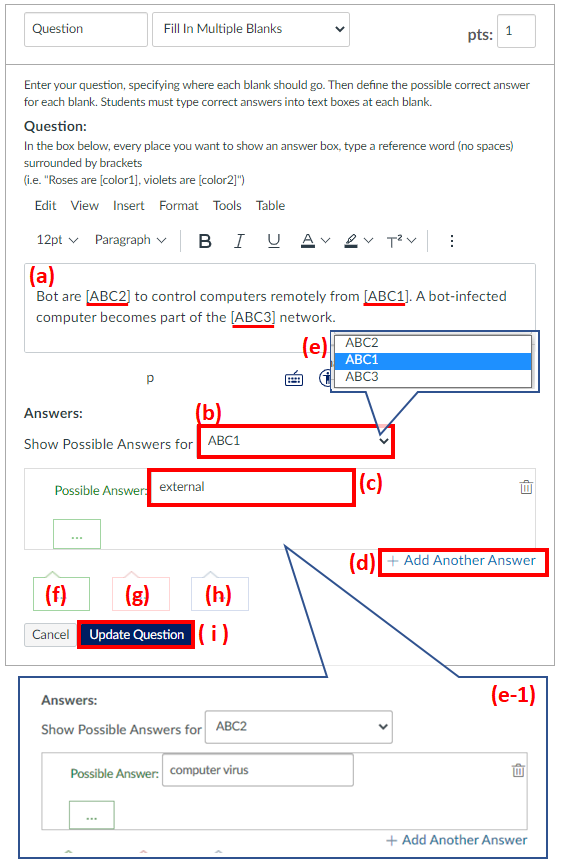
Fill in Multiple Blanks
The multiple fill-in-the-blank areas represent certain questions. The blank areas are set as [Single-byte Alpha-numerals] in parentheses.
(a) Entering the question here enables random contents, such as [ABC1] and [ABC2], to be set as the fill-in-the-blanks areas. The [Correct Answers] are to be linked to the blank areas of the question with (b) and entered in (c). If there are multiple correct answer patterns, click on (d) [+ Add Additional Answer] to add those answers. If the answer is to be entered in a different blank area, click on (b) and then select the blank area to be entered from (e). This will enable the correct answer for the selected blank area to be entered as (e-1).
Click on (f) to enter a comment pertaining to the correct answer. Enter comments pertaining to incorrect answers in (g), and general comments pertaining to the answer in (h). And finally, click on (i) [Update Questions] to complete the procedure.
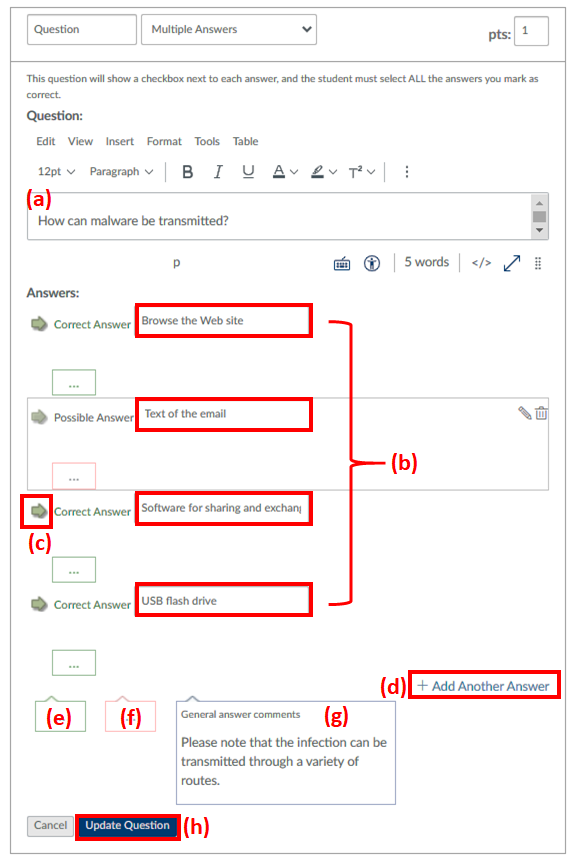
Multiple Answers
Questions for which respondents are prompted to select multiple correct answer. Tick boxes will be displayed beside each answer, and attending students will be required to select ALL of the answers the lecturer has set as correct.
(a) Enter the question here, and enter the [Correct Answers] and the [Incorrect Answers] in (b). Clicking on the arrow in (c) enables answers to be set as [Correct]. To add another answer, click on (d) [+ Add Another Answer] to add one. Click on (e) to enter a comment pertaining to the correct answer. Enter comments pertaining to incorrect answers in (f), and general comments pertaining to the answer in (g). And finally, click on (h) [Update Questions] to complete the procedure.
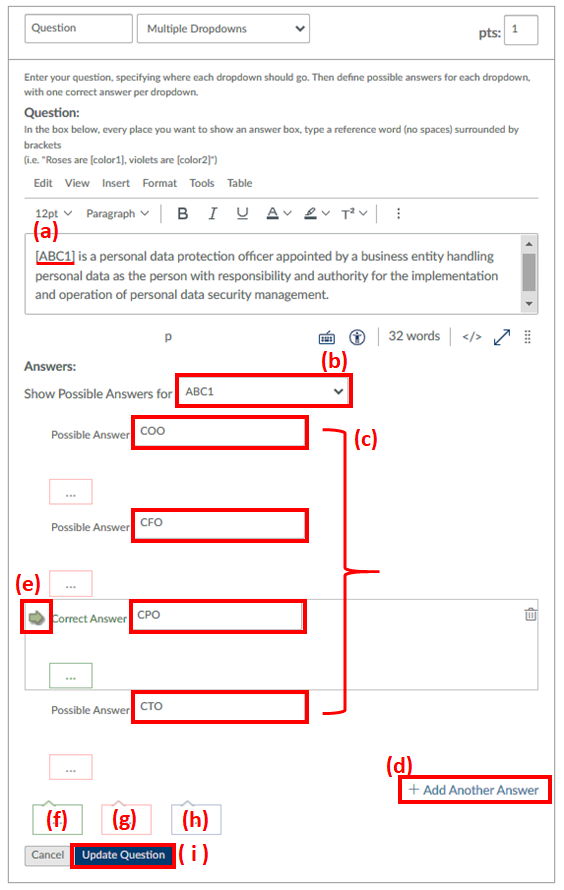
Multiple DropDowns
Correct answers are selected from the multiple dropdowns imbedded in the questions.
Enter the question in (a), select the alpha-numerals set as pull-down menus for the question in (b), and then enter the [Correct Answers] and the [Incorrect Answers] in (c). To add another answer, click on (d) [+ Add Another Answer] to add one. Clicking on the arrow in (e) enables the answer for that line to be set as [Correct]. Click on (f) to enter a comment pertaining to the correct answer. Enter comments pertaining to incorrect answers in (g), and general comments pertaining to the answer in (h). And finally, click on (i) [Update Questions] to complete the procedure.
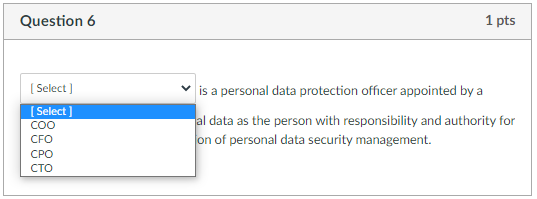
The questions set will be displayed as shown below.
Matching
These are matching questions. The correct answer for each relevant question in the list of questions is to be selected from the drop-down menu displayed on the right.
(a) Enter the question here, and then enter the question text for matching purposes and the correct answer in (b). The questions and correct answers on the left and right are linked together. To add another field for entering the question and correct answer, click on (c) [+ Add Another Answer] to add one. Selectable incorrect answers can be added in the column shown in (d). As can be seen by the arrows, it is possible to add several answers, not only one . Click on (e) to enter a comment pertaining to the correct answer. Enter comments pertaining to incorrect answers in (f), and general comments pertaining to the answer in (g). And finally, click on (h) [Update Questions] to complete the procedure.
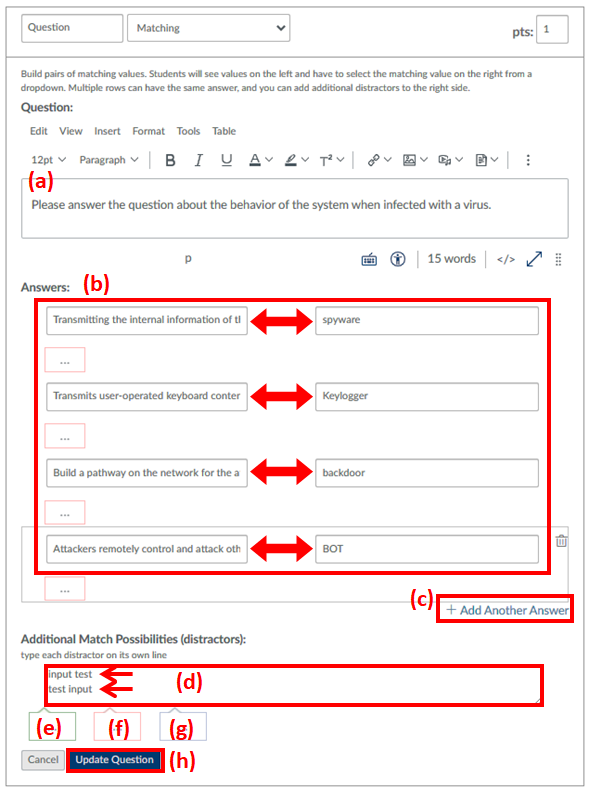
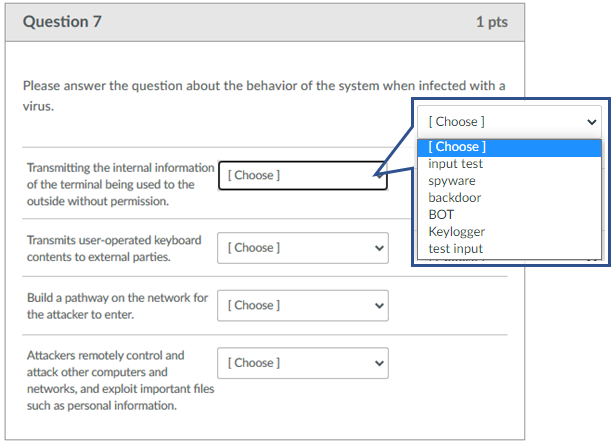
The questions set will be displayed as shown below.
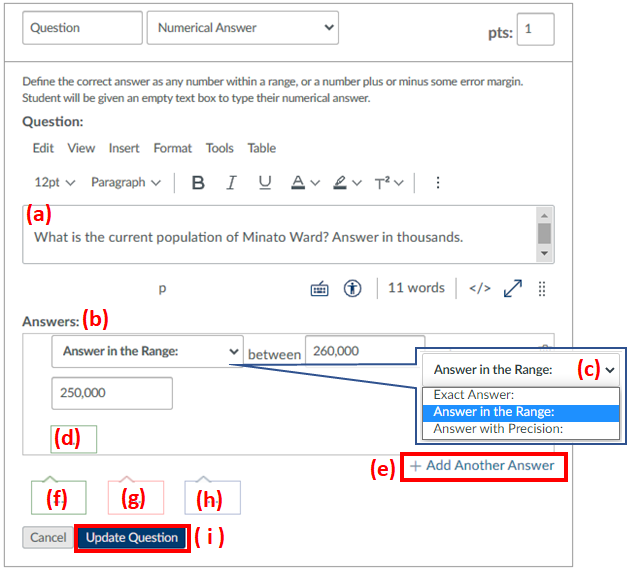
Numerical Answer
Questions that require a single-byte numerical value to be entered for the correct answer. The numerical range and the range of permissible error for correct answers can be set.
(a) Enter the question here, and enter the answer in (b). As shown in (c), select either [Correct Answer], [Numerical Range of Answer] or [Exact Correct Answer] when setting the answer. It is possible to enter a comment for the answer entered in (b) in (d). To add another answer, click on (e) [+ Add Another Answer] to add one. Click on (f) to enter a comment pertaining to the correct answer. Enter comments pertaining to incorrect answers in (g), and general comments pertaining to the answer in (h). And finally, click on (i) [Update Questions] to complete the procedure.
Formula Questions
Setting the formula and the numerical range of the variables included in the formula automatically generates a calculation question for attending students.
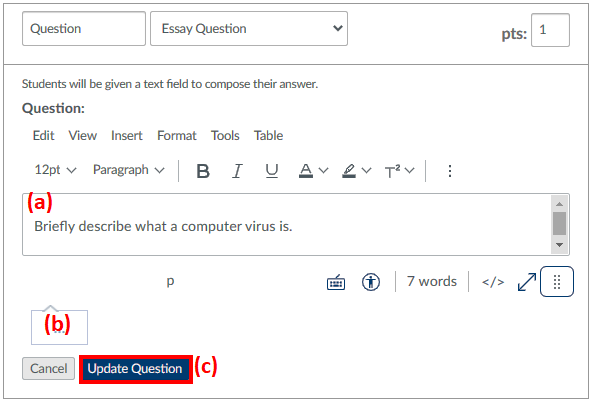
Essay Question
These questions require the answers to be written out. Marking must be done manually.
(a) Enter the question here, and enables a general comment pertaining to the answer to be entered in (b). And finally, click on (c) [Update Questions] to complete the procedure.
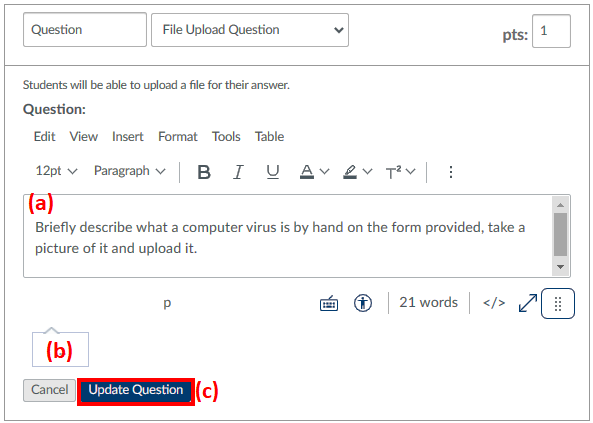
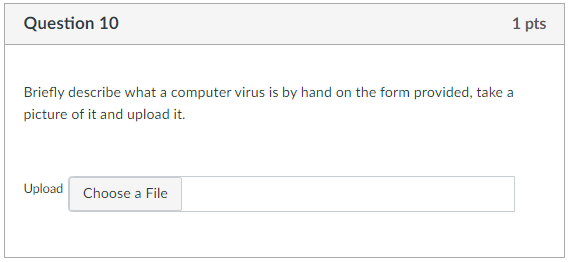
File Upload Question
Students will be prompted to upload their answer files. Marking must be done manually.
(a) Enter the question here, and enables a general comment pertaining to the answer to be entered in (b). And finally, click on (c) [Update Questions] to complete the procedure.
The questions set will be displayed as shown below.
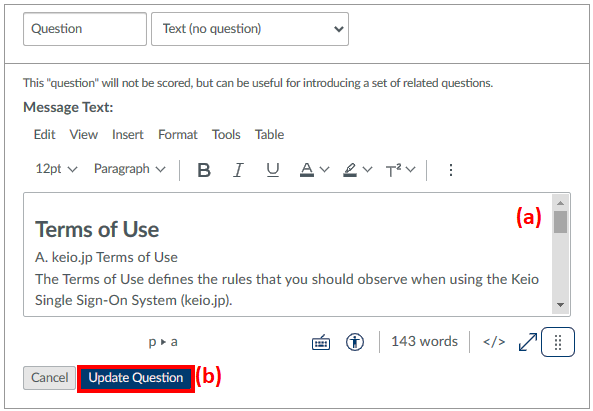
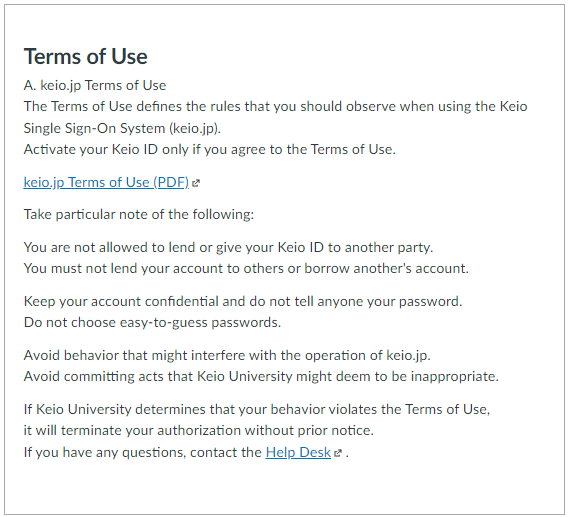
Text (no question)
Sets the text to be displayed. These are not questions. For example, this function is used if you wish to display lengthy passages containing explanations and question descriptions.
(a) Enter the text for explanatory purposes, etc. here, and then click on (b) [Update Questions] to complete the procedure.
The text set will be displayed as shown below.
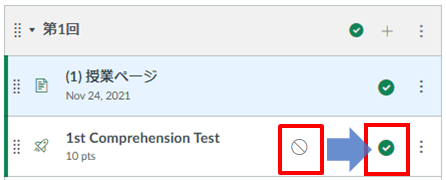
Making Quizzes Public
Click on the icon located next to the quiz title to set the parameters for making the created quiz public (the mark will turn green, and the contents will be able to be viewed by the attending students).
Question Banks
Newly-created questions for quizzes and surveys will automatically be stored in the course question banks. It is possible to run searches on questions stored in the question banks to add them to quizzes.
Question Bank Maintenance
-
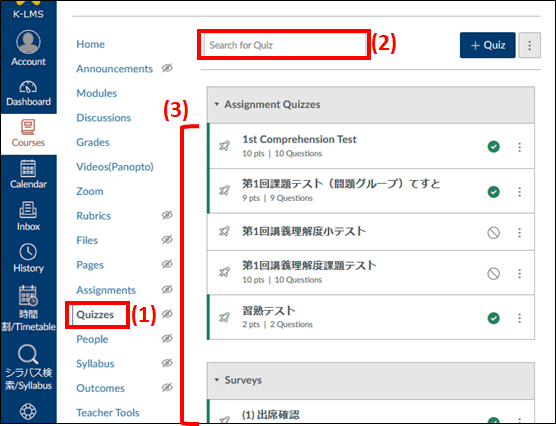
Click on (1) Quiz on the menu displayed on the left to run searches on created quizzes with (2). The field that can be searched is the quiz titles listed in (3).
-
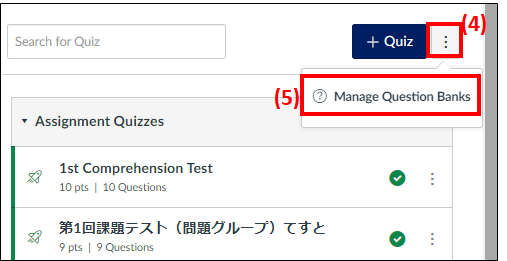
To manage the question bank or create questions directly, click on (5) [Quiz Bank Management] on the vertical 3-dot leader menu (4) shown at the top right-hand side of the quiz list.
-
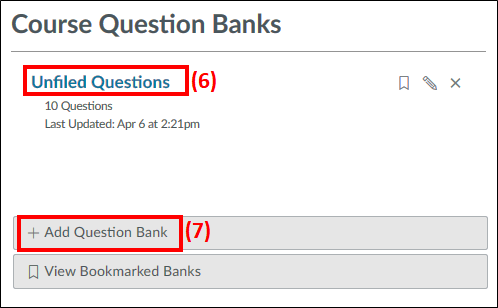
If the question bank has not yet been edited, the questions created on the course will be stored in the (6) [Non-Maintained Questions] question bank. It is possible to change the name of the bank or (7) newly-create a question bank.
-
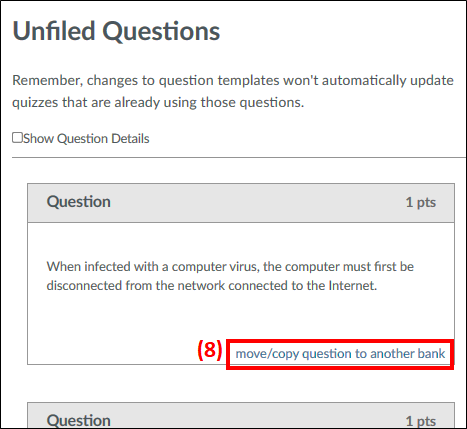
Non-maintained questions can be (8) moved and copied to other banks . It is possible to gather together all questions of a similar type in a bank with an easily-understandable title.
-
When moving or copying questions to a new question bank, enable the [New Question Bank] radio button and (9) enter the new bank name. If the question is to remain in the original question bank, add a tick to (10) and then click on (11) [Move/Copy Question].

Quiz: Adding Questions from Question Banks
-
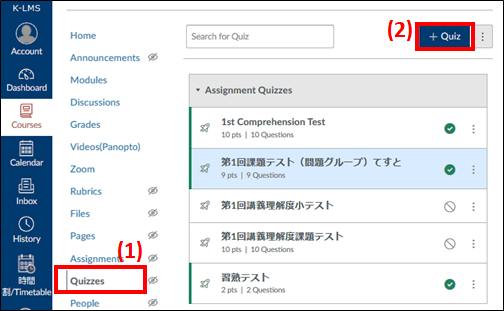
Click on (1) Quiz on the menu displayed on the left, and then click on (2) [+ Quiz].
-
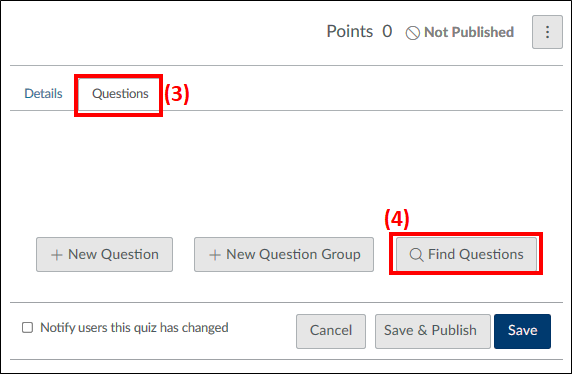
The quiz creation screen will be displayed. Click on the (3) [Question] tab, and then click on (4) [Question Search] . For information on items in the advanced tab, check the explanations for quiz editing and the advanced tab.
-
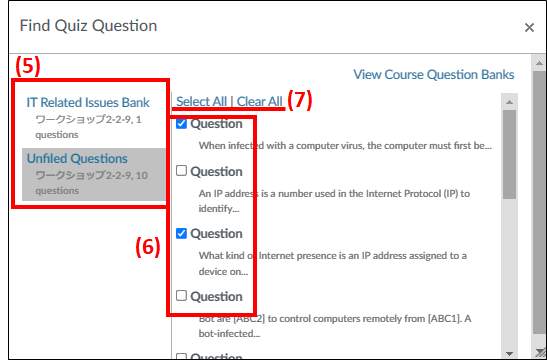
Select either the non-maintained question bank or the created bank with (5). You can select the questions that are to be set with (6). It is also possible to [Select All] or [Clear All] with (7).
-
Scroll down to the bottom and click on (8) [Add Question] to add it.
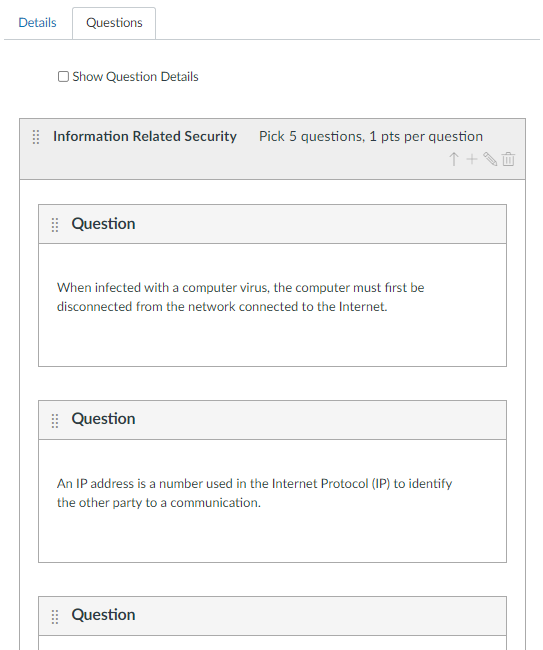
Quiz: Creating Question Groups and Adding Questions (Random Questions Set from Question Groups)
The use of question groups enables questions to be randomly set from multiple created questions.
-
Click on (1) Quiz on the menu displayed on the left, and then click on (2) [+ Quiz].
-
The quiz creation screen will be displayed. Click on the (3) [Question] tab, and then click on (4) [Question Search]. For information on items in the advanced tab, check the explanations for quiz editing and the advanced tab.
-
Select either the non-maintained question bank or the created bank with (5). You can select the questions that are to be set with (6). It is also possible to [Select All] or [Clear All] with (7).
-
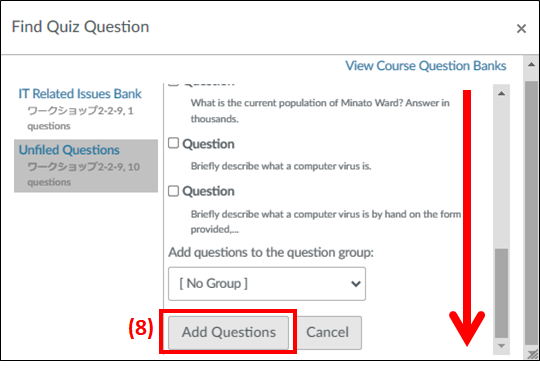
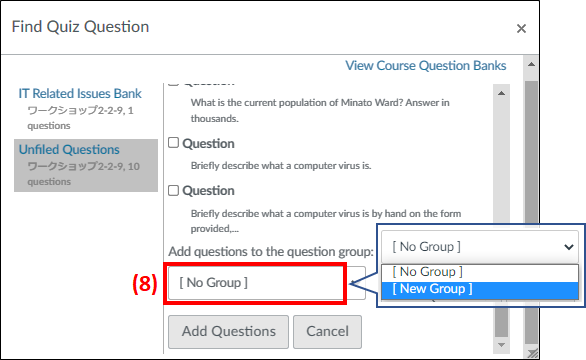
Click on (8) and select [New Group].
-
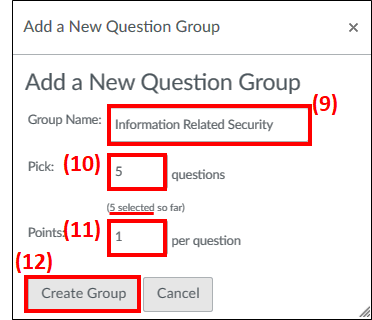
A window to add a new question group will be displayed with the group name displayed in (9) and the number of questions to be shown displayed in (10), and the number of questions registered in that group can also be checked with the red underlines. Set the number of points to be awarded for each question with (11), and then click on (12) [Create Group] to create the question group.
-
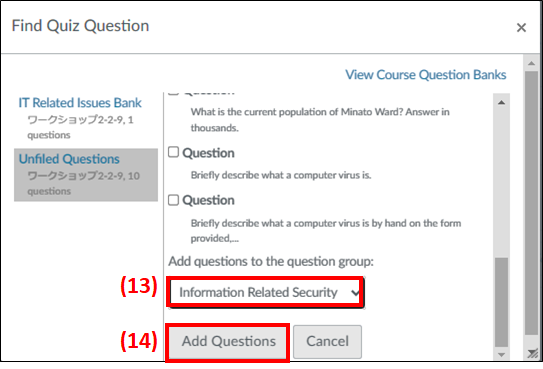
The name of the group created will be displayed in (13), so click on (14) [Add Selected Question] to add the question group to the quiz.
-
When questions are added to question groups, the questions will be incorporated into the group and displayed . The questions in this group will be set randomly.
Last-Modified: March 15, 2025
The content ends at this position.